Tuesday 22 December 2015

Chalk paint- some tips


I hadn't used chalk paint but had found it hard not to be a little intrigued about what all the fuss is about- you can't look on Pinterest without something being painted with the stuff! So I thought I would give it a whirl. I have written this blog to share some of the things I have found about chalk paint since that first project. I suggest you give it a try- it is a bit addictive and you tend to paint anything that isn't nailed down but it is a great way to give new life to something shabby or destined for the tip.
There are a few options on the market for chalk paint. The paint from Newton's Paints is really well priced and comes in little tins if you are a bit scared of investing too much to begin with. It is also available to buy online. There is the Annie Sloan products which are also good and available in loads of places, but I like to buy NZ made. Check out newton's online store HERE .
I thought that the 'no sanding' bit sounded like me and so on a sunny afternoon I cracked into it.
I rescued this little sidetable from the burn pile (the farmer tried three times to put it back on there!) and created this funky little striped table!
The ugly table that I started my chalk paint journey with.

Ok so here are some things I have learnt about chalk paint since this first table project:

  • THE BRUSHES: you don't need the fancy brushes that cost the earth, but a good quality brush will make the job have a nicer finish- talk to your hardware store about what is a good option- make sure you tell them you are working with chalk paint. I used the brushes from Newton's paint which start at $12.50 NZD, I have used a sponge for a small picture frame which gave a different effect again. or you could use a roller if you want a really smooth finish on a tabletop or something.
  • THE WAX: Get a brush for the wax, a piece of cloth will work but a brush is so much easier and gets into all the little corners. This also helps not using it all at once. The first time I did it, I used about half a bottle (of the liquid wax) on this little table and that was not necessary- in this case less is more. Also I found that the waxing step isn't as scary as I thought it was- it is actually quite easy and fast. I used two coats of wax on my table because I thought the top might last a bit better, I waited 24 hours between coats and it is really hard.
  • DARK WAX TIP: Have a damp cloth near by when applying dark wax. Applying dark wax can be very scary and intimidating at first. Every time I begin to apply it to an already beautiful chalk painted piece of furniture I hesitate. Here is a bonus tip: you always want to apply dark wax right after you have applied your clear wax. It makes it go on more smooth and is easier to spread around.  Don’t worry, you are not going to ruin your masterpiece with this intimidating darkness that you think will never come off. If you want, (here is another bonus tip) take a paper plate and plastic spoon and mix a little clear wax with your dark wax. This will give your antiquing vintage look that you are trying to achieve a soft finish. I like to have a clean damp cotton rag (old white t shirt) near by when doing a dark wax application just so I can spread it around easier or I can completely wipe off areas I'm not totally stoked about,  I have done that a few times!
  • BUFFING: Put your back into it! Also wait till tomorrow before you attack it, you get a better shine when the wax has had enough time to set. I used cheesecloth and it works really well. there are brushes available but I haven't tries so i cannot comment on their finish.
  • MIX THE PAINT: Make sure it is mixed properly. I sat my tin upside down for a bit and then gave it a bloody good shake. That seemed to do the trick.
  • THE FIRST COAT: I looked at my first coat and thought that I had been spun a yarn about how good this stuff is- it looked awful. However that coat dried in under and hour and I put the next coat on- then we were looking pretty sharp. The first coat was really rough and quite patchy with lots of brush marks. Once I put the second coat on, it smoothed out heaps and I wanted the brush texture so I applied it in all different directions to get a textured finish, you could be careful with your strokes following to grain to get a smoother look or apply it with a roller for a really even finish. But please do not panic at what it looks like in the beginning- more coats brings your project to life.
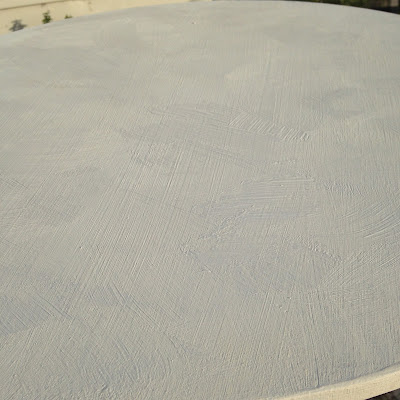
  • You can see the brush strokes in the paint, which is what I was after but you could follow the grain with a brush or apply with a roller to get a smooth finish. This is after the second coat.


  • LAYERS: layers work really well, if you want that chipped through vintage look of many years of painted layers then just paint multiple layers and chip each one as you go. Or just take some rough sandpaper and take some areas of paint off to make it look worn through to the next layer. There are some really good tutorials online for that and then wax it at the end. Or if you want stripes or patterns then just wait for the layer to dry, mask it up and paint straight over it. Then wax it to finish it. I used house paint for the stripes on this because I wanted to use the same colour I had on something else. You can create this with multiple layers of chalk paint though and there are heaps of colours available.

  • TO DISTRESS OR NOT TO DISTRESS: With this little table I didn't because I quite liked it the way it was but I have on projects since. This is quite easy and you can do it before or after the wax step- just on the google machine and find some projects that others have done to get some ideas about how distressed you want something to look. I found the thread on screws, steel wool and coarse sandpaper are the best (it sort of depends if you care about damaging the wood underneath as to how rough you want to be- sand paper is going to just damage the paint). I suggest buying something cheap or rescuing something that is being thrown out to have a practice on.
Have fun!
xx Abby

Tuesday 15 December 2015

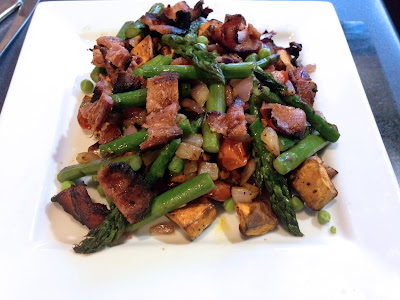
Hot Summer Vege and Bacon Salad

This time of year there is so much growing and coming ready for the table. It is a time of dining outdoors and throwing everything on the BBQ, it is also a really busy time on the farm so we are all about things that are healthy and yum but mainly that are fast to make!
Most of these ingredients can be grown yourself or picked up at a roadside stall at this time of year, eating seasonally is a healthy option but it is also easy on the pocket!

INGREDIENTS:
  • Fresh Asparagus (a bunch is about 300gm)
  • A handful of new peas or whole snowpeas- whichever you have
  • 2 Kumara cubed
  • 2 rashers bacon
  • 1/2 red onion chopped
  • 12 Cherry Tomatoes
  • A sprig of rosemary
  • Olive oil
  • Cracked pepper and rocksalt to season
METHOD:

Wash your asparagus and snap the bottoms off the stalks and chop in half. Steam the asparagus for about 3 minutes and then plunge into cold water.
Take your cubed kumara and toss in a little olive oil and finely chop and add your rosemary. Roast on 180 degrees for approx. 20 minutes. About 5 minutes before the kumara is ready put the bacon, red onion and cherry tomatoes in the oven to roast also (I put them all in together on one dish).
In a pan on the stove heat a little olive oil (and/or butter if you choose). Add the asparagus and peas and toss to heat through and brown slightly. Remove your roasted veges and bacon form the oven. Take your bacon and roughly chop into pieces. Now combine everything together, season with salt and pepper and serve either as a main or as a side with something off the BBQ.

TIPS:

  • Replace any of the ingredients with what you have in the garden- beans, baby beetroot and baby carrots roasted are all scrummy.
  • If you have the BBQ on, you can cook all the veges on there- maybe just par-boil the root veges a little to get them cooked all the way through.
  • I haven't used a dressing as I felt that there was enough olive oil in the process but if you love condiments then live little- throw them on there, an aioli would be pretty good i recon!


Enjoy xx
A

Tuesday 18 August 2015

Tomato, Olive & Mozzarella meatballs

This recipe is such a favorite in our house- the farmer even asked for it on his birthday! Buffalo Mozzarella bocconcini (which is just the name for small balls of mozzarella) is by far the best to use but sometimes the budget or availability don't make that possible so the packet stuff is fine. I often roll this one out for visitors as it goes really well with a glass of wine and is easy to make double amounts of if you have more than 4.

INGREDIENTS:

  • 2 c fresh breadcrumbs
  • 1/3 c milk
  • 750g beef or pork mince
  • 1/3 c basil pesto
  • 1/3 c chopped flat leaf parsley leaves
  • sea salt & cracked pepper
  • 2 Tblsp olive oil
  • 500g cherry tomatoes (slice in half & remove the seeds)
  • 1/4 cup oregano sprigs
  • 1 c green olives (or whatever olives you like- I often used stuffed)
  • 200g baby bocconcini
  • 1 cup basil leaves
METHOD:
In a bowl place your bread crumbs and pour over the milk. Stand until the milk has absorbed. Place the mince, pesto, breadcrumb mixture, parsley, salt & pepper in a bowl and mix well to combine. Beat the mixture with a spatula for 2 minutes until smooth. Roll 1/4 cupfuls of the mixture with meatballs.
Preheat the oven to 200 degrees C. Heat the oil in a non stick pan and cook the meatballs, in batches, for 2 minutes each side each side or until golden but not cooked through. Transfer the meatballs into a baking dish with the cherry tomatoes, oregano, olives and bocconcini. Bake for 20 minutes or until the cheese is melted and the meatballs are cooked through. Sprinkle with the basil leaves and serve with crusty bread.

enjoy xx
A


Sunday 26 April 2015

Little puddings

Sorry about the rubbish photo- lets call this dessert 'rustic'! These little guys must have been made a thousand times in our house, I'm sure my sister is laughing as she reads this post. This recipe is a bit 80's really, microwave deserts were all the rage then but who cares- they are yummy! A great treat to make with the kids, they love watching them explode out of the cups in the microwave!
Add some vanilla ice cream or custard to make a delicious little dessert.

INGREDIENTS:
  • 4 Tblsp jam
  • 50g butter
  • 1/4 c sugar
  • 1 egg
  • 1 c flur
  • 1 tsp baking powder
  • 1/2 c milk
METHOD:
Lightly grease 4 straight sided coffee mugs. Put 1 Tblsp of jam in each mug. Put butter in a bowl and microwave until melted (about 30 seconds). Add sugar and egg and whisk well. Sift in flour and baking powder. Add milk. Mix it all well. Put mixture evenly in the mugs on top of the jam. Put mugs in microwave, cook on high for 3-4 minutes. Stand for 1 minute. Run knife around the edge and tip out.

Enjoy xx
A

Saturday 25 April 2015

Chicken, Prawn and tomato paella


This is the best recipe for those that have not tried making paella before. I was a bit scared of making paella the first time because I thought it looked hard to make and that it would take all day but that is not the case, especially with this recipe.
If you can get some devine seafood and have the time to potter and make the sauce etc, then seafood paella is to die for (and is not as hard as you  might think) but on a weeknight when the troops need fed- this is a great option. This paella is full of flavour, makes the kitchen smell AMAZING and all in half an hour (which includes 20 minutes to enjoy your wine while it simmers away).

INGREDIENTS:
  • 1 ½ Tblsp olive oil
  • 1 x 200g chicken breast fillet, trimmed and chopped
  • 200g green (raw) prawns (shrimp), tails intact
  • 2 Chorizo sliced 
  • 1 small brown onion, chopped
  • 2 cloves garlic, crushed
  • ½ tsp chilli flakes
  • ½ tsp moked paprika
  • ¾ c (150g) medium-grain rice
  • 1 x 400g can diced tomatoes
  • 1 ¼ c (310ml) chicken stock
  • flat-leaf parsley leaves and lemon wedges, to serve
METHOD:


Heat 1 Tblsp of the oil in a medium non-stick frying pan over high heat. Add the chicken, chorizo and prawns and cook for 4–5 minutes or until golden and cooked through. Set aside and keep warm. Add the remaining oil to the pan with the onion, garlic, chilli and paprika and cook for 2 minutes or until softened. Add the rice, tomato and stock, stir through and reduce heat to low. Cover. Cook for 20–25 minutes or until the rice is cooked and the liquid is absorbed. Stir through the chicken, chorizo and prawns and cook for a further 1 minute. Top with parsley and serve with lemon wedges. Serves 2.

Enjoy xx
A

Friday 17 April 2015

The best day ever!

On Friday the 13th (yes black Friday) of February, the farmer and I got off the farm for the weekend and had ourselves a wedding! It was amazing, to be surrounded by our closest family and friends for a weekend of fun, love and laughter (lots of laughter). A special thanks must go to our amazing wedding party that worked tirelessly to make it all come together and that really are incredible people xxx and to everyone that was a part of our day, the experience was incredibly humbling and we thank you from the bottom of our hearts
All the boys had their own handkerchief for the day

the shoes in teal

the farmer and his main men

Our lovely and talented aunty Karen did our flowers

Our cute and cheeky nephew Angus

Tekapo is stunning


The Mt John woolshed really came together and everyone fitted! 30 more than ever before...

The farmer's mother made the cake and his very clever sister iced it


Each placemat had our guests name, some puzzles and a special message to them, a nice way to thank them all
the weather was very kind


one of the farmers projects was to make these letters- he did an amazing job xx

The hangover only lasts a day, the memories last a lifetime

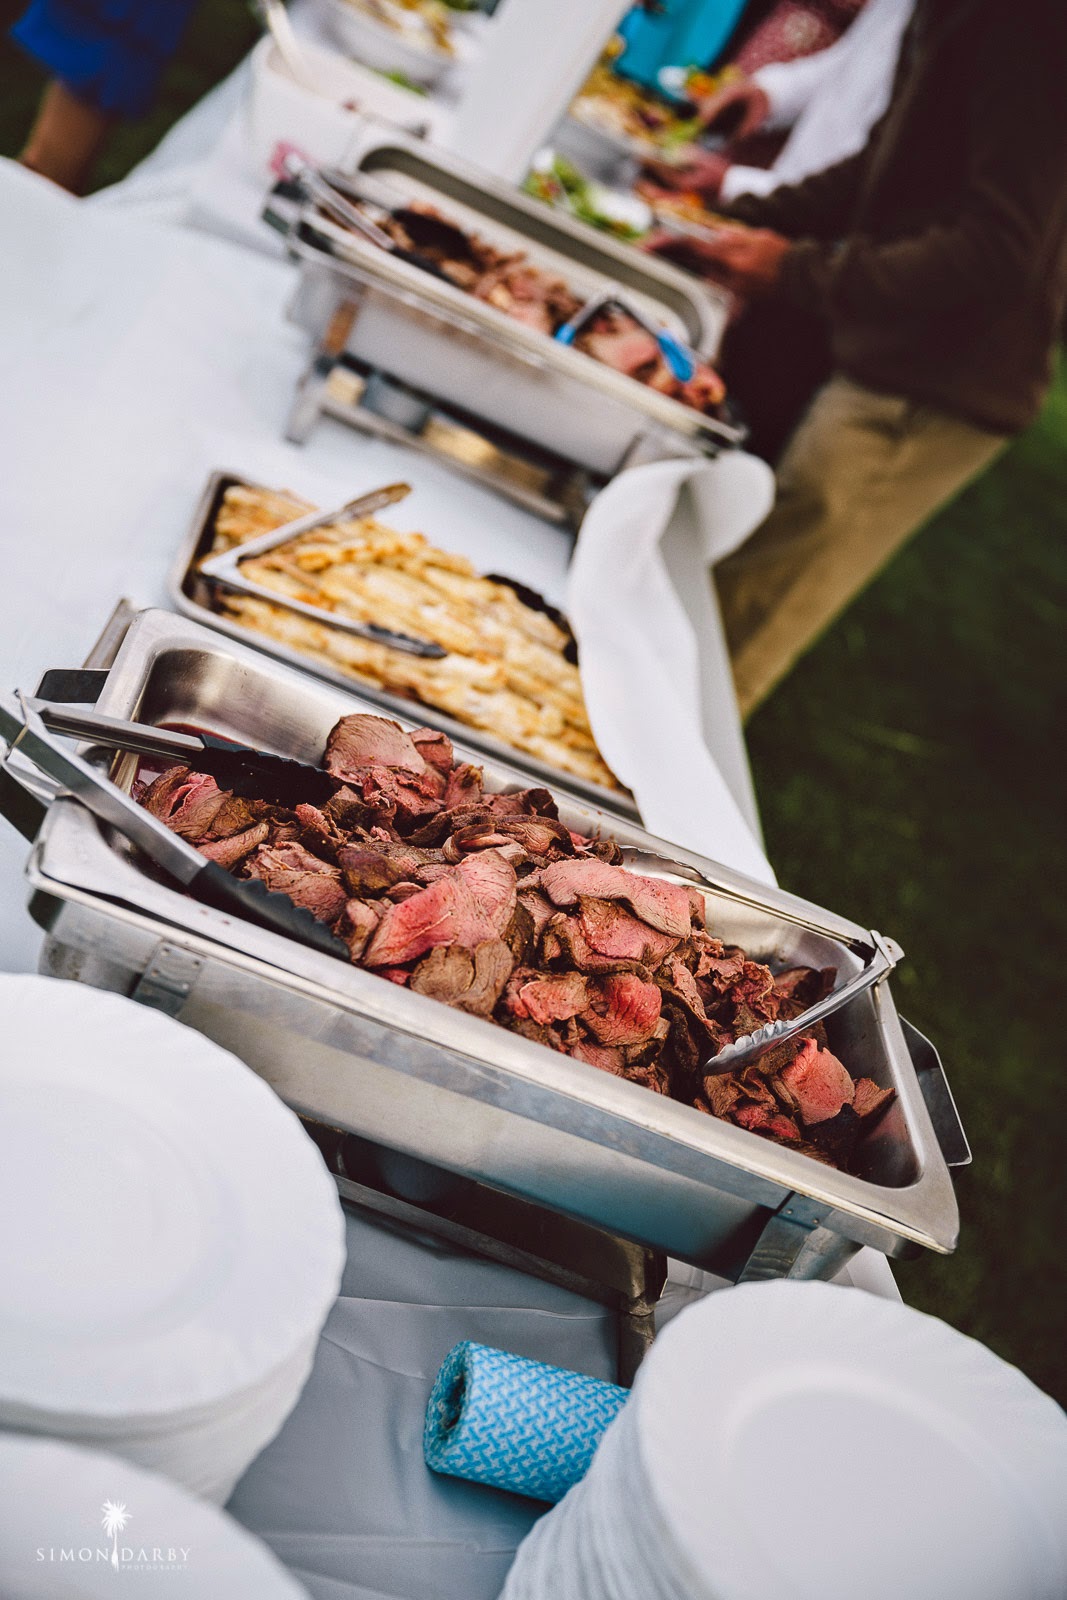
When a farmer gets married, you need plenty of meat!

Ribeye rolls, so darn good


A special thanks to the chef xxx Kelvin is not only a great friend he is also one very talented chef!

Each table had a ploughman's board to start

"girl food" as described by the farmer


100 dozen beers, 4 cases of white, 4 cases of red, 40L pimms, 40L punch, 4 cases of bubbles and some fizz....

a quick change into cowboy boots ready for the dancing!!

dessert was tasting plates, 160 slices of cake and not one left!

and into the night the party went....


The last of the summer salads..


I must say I am a bit sad to see our summer going this year, I know it has been one of the hardest summers for farming that we have faced in a while with the drought greatly affecting our farming business. But despite the fact that we are feeding out already and knowing that winter for us is going to be a long hard fight, there is a sadness for me that those lovely warm evenings with a cold drink and friends by the BBQ are over for another year.
This salad is on one of the platters that the farmer made for our wedding (blog on that to come) and the succulent tomatoes came from the farmers parents abundant glasshouse.
On a bright sunny day, (even a slightly chilly autumn one) there is something about savouring those last bursts of summer flavour and reflecting on what has been a pretty busy summer.
Now one must get excited about the scrummy comfort food that the colder months will bring....

INGREDIENTS:
Salad:
  • A mixture of lettuce types (I used mescaline, iceberg and fancy for a bit of colour)
  • 1 carrot, grated 
  • 6 tomatoes
  • 1 red capsicum, sliced finely
  • 1 yellow capsicum, sliced finely
  • 2 avocados, peeled and cut into 1cm cubes
  • Green sprouts
Lemon vinaigrette:
  • 1/2 tsp finely grated lemon zest
  • 2 Tblsp lemon juice
  • 1 tsp sugar
  • 1/2 tsp Dijon mustard
  • 1/4 tsp sea salt
  • 3 to 4 Tblsp extra-virgin olive oil
  • Freshly ground black pepper to taste
METHOD
Make your vinaigrette first. In a small bowl, whisk together the lemon zest, lemon juice, sugar, mustard, and sea salt, whisking until the sugar and salt are dissolved. Add 3 tablespoons of the oil in a slow stream, whisking constantly until the dressing is well blended (this is a bit tricky, if you have a small bottle or jug it makes it easier as you want to do this as SLOWLY as possible. Season with fine sea salt and freshly ground black pepper. If desired, whisk in the remaining oil in a slow stream, whisking constantly. Set aside.

Take all of the salad ingredients and toss together in a large mixing bowl to combine. Now drizzle over the dressing and gently toss the dressing through, if your avocado is a bit soft then you may want to add it last.
Arrange your salad on your serving platter or bowl and serve alongside the meat that is on the menu.
TIPS:
  • You can make the vinaigrette ahead of time and refrigerate it in an airtight container, it will last up to 3 days.
  • Add garlic to the dressing for extra flavour

Enjoy xx
A

Tuesday 24 February 2015

40 Second Omelette

I believe anyone can have a cooked breakfast everyday, even the busiest of us can spare 40 seconds to make this delish and healthy start to our day!

INGREDIENTS:
  • 2 eggs
  • 2 Tblsp water
  • salt and pepper
  • 1 Tblesp butter or olive oil
  • 1/4cup fillings- your choice; ham, cheeses, mushrooms, green peppers, chopped onions, bacon, cooked chicken, olives, sun dried tomatoes, tomatoes, spinach (pretty much anything that is in your fridge)
METHOD:
Get your fillings ready first, if they need cooked then do this first. I like to chop mushrooms, onions and a little bacon or ham and cook in a pan, then I turn off the heat and add fresh spinach at the last minute and let the heat of the mushrooms and onions cook it a little.
Beat water and eggs together with a whisk until fluffy.
In a non stick pan, heat you butter or oil and cover the surface. Add the the egg mixture.
With a  spatula (non stick friendly of course)  pull cooked portions of egg from the outside of the pan into the center so the uncooked egg runs onto the hot surface. Tilt your pan as you go so that the omelette remains round. Do this until the egg will no longer flow but is still wet on the top (this takes about 20 seconds).
Sprinkle your filling on one half of the omelette. Slide your spatula under the omelette to half way, fold the unfilled side over the fillings. Set aside your spatula- now comes the tricky/potentially messy bit.
Holding the pan in one hand and your plate in the other, turn the pan upside down to flip the omelette out onto the plate.
Garnish with fresh shopped parsley and/or chives.
Enjoy x
A