Showing posts with label Salads and Sides. Show all posts

Sunday, 3 October 2021

Pull apart bread

Perfectly delicious pull apart bread, it starts with herb infused dough and is baked until golden brown and served pull-apart style. This flaky and flavorful bread is completely irresistible. Wait untill you smell it baking! This recipe is perfect for using as little slider buns or as a side with salad and meat from the BBQ. Credit to Arwen for sharing this recipe with me, however we have both agreed to try not to make this all the time!

INGREDIENTS

BREAD

  • 300mls warm water
  • 1 tsp sugar
  • 2 tbsp of yeast
  • 3 tbsp of oil or butter
  • 1 tsp of salt
  • 1tbsp mixed herbs- I use thyme & Rosemary and basil
  • 3 cups of flour
TOPPING
  • 60g of butter
  • 1-2 cloves of garlic
  • 1/4 cup of pesto
  • 1/2 cup of cheese - I use a mix of Parmesan and Tasty

METHOD:

Combine yeast sugar and water and let yeast activate for about 10 mins.

Add in flour, oil, salt and herbs and mix on medium speed for around 8 mins, or knead on a floured surface for around 15 mins.

Leave in a warm place to double in size. This dough is really quick rising and doubles in around 20 mins.

Once risen, remove dough from bowl and start getting creative. You can make a few small loaves, or one big one! Pull apart 50cent size pieces of dough, roll into a ball and assemble into desired shape. 
For the topping, combine garlic and butter. Brush the top of the bread with the butter mixture. Brush the bread with pesto and sprinkle with grated cheese. 

Leave to proof for around 5-10 mins and bake on 180 degrees celcius until golden.

Tips

  • Use your imagination for toppings, some ideas:
    • Finely chopped bacon and cheese
    • Change up the flavour of the pesto- sundried tomato, roasted capsicum or basil are great. The supermarket sells chunky pesto dips that also work really well.
  • You can make some different types of loaves- either one big loaf, small buns or divide the dough up into 12 balls and roll each ball out into a small disc, put the topping on each disc and fold in half before stacking into a loaf tin to bake. The filling will be spread throughout the pull apart bread.
Enjoy xxx

Saturday, 2 October 2021

Garlic Butter Flatbreads

Flatbreads are super easy to make and they are versatile too! Turn them into garlic naan, middle eastern wraps, use them to make mini pizzas or cut them into little triangles and toast to make pita chips perfect for platters! I got this recipe during lockdown from my lovely friend Jess and it is a cracker! 

Makes 4-6 flatbreads. Prep time 10 minutes (+ at least 15 minutes to rest dough) Cook time: 20 minutes.

INGREDIENTS

FLATBREADS

  • 2 cups self-raising flour (or plain/high grade flour with 2 1/2 tsp baking powder added)

  • 3/4 cup milk (of any kind), or plain yoghurt or water
  • 1 1/2 Tblsp olive oil
  • 1/4 tsp salt
GARLIC & HERB BUTTER
  • 2 Tblsp softened butter

  • 1 clove garlic, finely chopped

  • 2 tsp finely chopped parsley

METHOD:

Place the flour, milk, oil and salt in a bowl and mix to combine. 

Knead on a floured surface for 5 minutes or until dough is smooth and elastic. Divide into four or six portions, and leave on the bench to rest for at least 15-30 minutes (this helps relax the gluten).

If using garlic and herb butter, mix all the ingredients together. 

Heat a large, heavy bottomed skillet or fry pan on medium heat. Roll each piece of dough out into a roughly 25cm circle and lightly brush with a little oil. Place in a hot pan and cook for about 2 minutes each side or until puffed and golden. Spread with garlic and herb butter whilst still hot. Repeat with remaining dough. Serve hot.

Tips

  • The dough needs at least 15mins to rest (to relax the gluten) but you can leave it for several hours on the bench, or even over night (if leaving overnight, just make sure you wrap it tightly in plastic wrap to avoid a skin forming on the outside.
  • Gluten-free flour can be used to make flatbreads, but use yoghurt to add protein to help with keeping the bread together.
  • Whilst the flatbreads are best eaten freshly cooked, you can reheat them in the oven, wrapped up in tinfoil to stop them drying out.
  • If you don't have a pastry brush (for brushing flatbreads with oil), just drizzle each flatbread with a little oil before placing in the hot pan.

Enjoy xx

Tuesday, 2 February 2021

How To Cook Broad Beans

Broad Beans were on my 'OK but not super keen on them' list until I learnt how to prepare them. Double podding, or double shelling is the process in which you get rid of the tough outer skins and use the bright green, tender tasty little morsels hidden within the beans and it's super easy! Broad Beans are great for salads, teamed with BBQ and adding to pasta dishes. They are easy to grow too- win win!

INGREDIENTS

  • 500g Borad Beans (or however many you have picked from the garden for dinner!)
METHOD:

Remove the beans from the pod. Bring a pot of water to the boil and place the beans in the water. Boil for 2 minutes. Drain immediately and place in a bowl of iced or very cold water to stop the cooking process. Gently squeeze each bean until the middle pops out. Discard the outer skins.
Serve cold in a salad, reheat as a side or stir through your favourite pasta or risotto dish to add vibrant colour and taste!

Enjoy xx

Sunday, 24 January 2021

Summer Vegetable Fritters

 
My grandmother used to say things that we would be all well served to take on board- one of these such statements was that "just because you have a lot of something doesn't mean you should waste it". She was talking about vegetables but it pretty much applies to everything in life- including money, friends and love!
During the summer in particular you can end up with a bit of a glut of some veges, these little fritters are a great way to use some of them up, especially when they are getting close to past their best. They are also a pretty handy trick for getting veges into the kids, and they freeze well so they can be a great addition to lunch boxes well after these veges are out of season.

INGREDIENTS

You can vary the vegetables you use depending on what you have on hand:
  • 1 cup of grated potatoes
  • 2 cups of grated/ finely chopped vegetables of your choice- carrots, spinach, onion, broccoli, corn, peas
  • 1/2 cup flour
  • 1/2 tsp baking powder
  • 1/2 tsp salt
  • 1/2 tsp ground corriander seeds
  • 1/2 tsp ground cumin seeds
  • 3 eggs
METHOD:

Grate the potatoes and then wash and drain. Grate or finely chop the remianing vegetables (I use my Tupperware Turbo Chef to chop them up).
Beat the egss. Mix the dry ingredients and the beaten eggs until you have a smooth batter (try not to over-mix because the fritters will be tough). Add the vegetables and stir through the batter. Heat a large pan and add oil and/or butter to fry the fritters. Add heaped teaspoons of batter to the pan to create small fritters (small fritters are easier to cook all the way though without burning the outside). Fry until golden on both sides.
Serve as a side with dinner, as a yummy healthy snack or light lunch.

TIPS:
  • You can make these in big batches and freeze the fritters, a quick heat in a frying pan will make them just like when you first made them. 
  • Serve them in a stack with bacon or smoked salmon and some horseraddish mayo (see recipe here) for a quick and yummy brunch or lunch.
  • These are a great addition to your kids lunch boxes. When we were kids, Gran used to put the mixture into metal cookie cutters in the pan- we obviously thought they tasted better when they were a cool shape!?!
  • You can add chilli if you like them with a little bit of spice
Enjoy xx

Tuesday, 15 December 2015

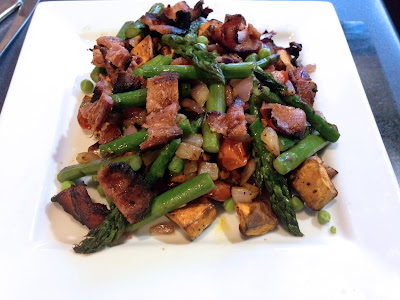
Hot Summer Vege and Bacon Salad

This time of year there is so much growing and coming ready for the table. It is a time of dining outdoors and throwing everything on the BBQ, it is also a really busy time on the farm so we are all about things that are healthy and yum but mainly that are fast to make!
Most of these ingredients can be grown yourself or picked up at a roadside stall at this time of year, eating seasonally is a healthy option but it is also easy on the pocket!

INGREDIENTS:
  • Fresh Asparagus (a bunch is about 300gm)
  • A handful of new peas or whole snowpeas- whichever you have
  • 2 Kumara cubed
  • 2 rashers bacon
  • 1/2 red onion chopped
  • 12 Cherry Tomatoes
  • A sprig of rosemary
  • Olive oil
  • Cracked pepper and rocksalt to season
METHOD:

Wash your asparagus and snap the bottoms off the stalks and chop in half. Steam the asparagus for about 3 minutes and then plunge into cold water.
Take your cubed kumara and toss in a little olive oil and finely chop and add your rosemary. Roast on 180 degrees for approx. 20 minutes. About 5 minutes before the kumara is ready put the bacon, red onion and cherry tomatoes in the oven to roast also (I put them all in together on one dish).
In a pan on the stove heat a little olive oil (and/or butter if you choose). Add the asparagus and peas and toss to heat through and brown slightly. Remove your roasted veges and bacon form the oven. Take your bacon and roughly chop into pieces. Now combine everything together, season with salt and pepper and serve either as a main or as a side with something off the BBQ.

TIPS:

  • Replace any of the ingredients with what you have in the garden- beans, baby beetroot and baby carrots roasted are all scrummy.
  • If you have the BBQ on, you can cook all the veges on there- maybe just par-boil the root veges a little to get them cooked all the way through.
  • I haven't used a dressing as I felt that there was enough olive oil in the process but if you love condiments then live little- throw them on there, an aioli would be pretty good i recon!


Enjoy xx
A

Friday, 17 April 2015

The last of the summer salads..


I must say I am a bit sad to see our summer going this year, I know it has been one of the hardest summers for farming that we have faced in a while with the drought greatly affecting our farming business. But despite the fact that we are feeding out already and knowing that winter for us is going to be a long hard fight, there is a sadness for me that those lovely warm evenings with a cold drink and friends by the BBQ are over for another year.
This salad is on one of the platters that the farmer made for our wedding (blog on that to come) and the succulent tomatoes came from the farmers parents abundant glasshouse.
On a bright sunny day, (even a slightly chilly autumn one) there is something about savouring those last bursts of summer flavour and reflecting on what has been a pretty busy summer.
Now one must get excited about the scrummy comfort food that the colder months will bring....

INGREDIENTS:
Salad:
  • A mixture of lettuce types (I used mescaline, iceberg and fancy for a bit of colour)
  • 1 carrot, grated 
  • 6 tomatoes
  • 1 red capsicum, sliced finely
  • 1 yellow capsicum, sliced finely
  • 2 avocados, peeled and cut into 1cm cubes
  • Green sprouts
Lemon vinaigrette:
  • 1/2 tsp finely grated lemon zest
  • 2 Tblsp lemon juice
  • 1 tsp sugar
  • 1/2 tsp Dijon mustard
  • 1/4 tsp sea salt
  • 3 to 4 Tblsp extra-virgin olive oil
  • Freshly ground black pepper to taste
METHOD
Make your vinaigrette first. In a small bowl, whisk together the lemon zest, lemon juice, sugar, mustard, and sea salt, whisking until the sugar and salt are dissolved. Add 3 tablespoons of the oil in a slow stream, whisking constantly until the dressing is well blended (this is a bit tricky, if you have a small bottle or jug it makes it easier as you want to do this as SLOWLY as possible. Season with fine sea salt and freshly ground black pepper. If desired, whisk in the remaining oil in a slow stream, whisking constantly. Set aside.

Take all of the salad ingredients and toss together in a large mixing bowl to combine. Now drizzle over the dressing and gently toss the dressing through, if your avocado is a bit soft then you may want to add it last.
Arrange your salad on your serving platter or bowl and serve alongside the meat that is on the menu.
TIPS:
  • You can make the vinaigrette ahead of time and refrigerate it in an airtight container, it will last up to 3 days.
  • Add garlic to the dressing for extra flavour

Enjoy xx
A

Saturday, 20 September 2014

Guacamole

Guacamole is great as a dip with corn chips or served with nachos as dinner

INGREDIENTS:
  • 2 ripe avocados
  • 1/2 teaspoon ground rock salt
  • 1 Tbsp of fresh lime juice or lemon juice
  • 2 Tbsp to 1/4 cup of very finely diced red onion or thinly sliced green onion
  • a pinch of fresh sliced chilli (only if you like the spice)
  • 2 tablespoons cilantro (leaves and tender stems), finely chopped
  • freshly grated black pepper
  • 1/2 ripe tomato, seeds and pulp removed, chopped finely
METHOD:
Halve your avocados and remove the flesh and place into a bowl. Roughly mash up the avocado with a fork so it is chunky mush. Add the lemon or lime juice and salt and stir together- the citrus will stop the avocados going brown.
Add the rest of your chopped ingredients, but I suggest that you add the chillies slowly and taste so you don't end up with your tongue on fire! Guacamole is great because it can be varied to your taste or what seasonal produce is available, start with this recipe and then mix it up to your taste buds.
Cover with plastic wrap until you are ready to serve (note: if you are making this ahead of time it is a good idea to leave your tomatoes out until just before serving and stir them in then because their flavour is diminished when put in the fridge.
Serve with corn chips or over nachos.

TIPS:
  • For a very quick guacamole just take a 1/4 cup of salsa and mix it in with your mashed avocados.
  • The most basic version of guacamole is mashed avocados with salt. Don't let the lack of availability of other ingredients stop you from making guacamole.
  • To extend a limited supply of avocados, add either sour cream or cottage cheese to your guacamole dip. Purists may be horrified, but so what? It tastes great and it makes it go further- result.
Enjoy xx
A

Tuesday, 26 February 2013

Summer chicken salad

Add a fantastic flavour to chicken by dredging it in basil and  and garlic and lightly pan frying it. Serve tossed together with the crisp produce of summer for a light, healthy lunch. The best bit is that you can have it on the table and spread it to as many hungry mouths come through the door in under 10 minutes.

INGREDIENTS: (for one person- multiply for more people)
  • 1 chicken breast per person or two chicken thighs
  • 1 tomato sliced into wedges
  • 3 asparagus stalks cut into quarters
  • 2 large lettuce leaves
  • 1/4 cup soft cheese Brie/Camembert 
  • 1 Tblsp Extra virgin olive oil
  • 1 Tblsp basil pesto
  • 1 tsp soy sauce
  • 1 tsp honey
  • 1 tsp white wine vinegar
  • 1 clove crushed garlic
  • mayonnaise to serve
METHOD:
Cut chicken into 6 pieces. Place into a bowl with the pesto, soy sauce, white vinegar, garlic and honey. Cover with glad wrap and place in fridge. Marinade your chicken for at least an hour, overnight is best.
Lightly steam the asparagus and leave to cool while you cook the chicken. Cook chicken in a pan with the olive oil until golden on all sides and cooked through.
To prepare the salad, combine all of your salad greens, including your asparagus and arrange on your plate(s). Sprinkle with cheese, and top with tomato and chicken. Serve with home-made mayonnaise on the side.

TIPS:
  • Add any other goodies that you have in the vege garden or find in season at the farmers market like avocado, cherry tomatoes, spring onions, red onion or fresh torn spinach.

Wednesday, 18 July 2012

Cheesy onion potato bake

Potato bake is a great side for any meal, this one has no cream so not so bad for the size of your bum- just don't think about all that cheese! Oh who cares anyway- potato bake is so yum, just don't put it on the menu every night of the week.
This version of potato bake was made up because of a lack of cream in the house, however it still has all of the characteristics of a traditional potato bake- rich, creamy and very morish!

INGREDIENTS:
  • cooking spray
  • 1 kg potatoes (about 6 potatoes)
  • 1 large brown onion, sliced
  • 1 c grated cheese
  • 1 c milk
  • 2 tsp chicken stock powder
  • 2 Tblsp fresh chopped parsley
  • freshly ground black pepper
METHOD:
Preheat oven to 180 degrees Celsius. Spray a 20 x 20cm casserole dish or similar with cooking spray.
Peel potatoes and evenly thinly slice. Place 1/4 of the potatoes in a layer at the bottom of the baking tray. Cover with 1/3 of the onion slices and then sprinkle with 1/4 of the cheese. Repeat layers of potato, onion and cheese. The last layer should be potato and cheese.
Combine milk, stock powder, parsley and pepper, mixing well. Pour evenly over potato layers.
Cover with foil and bake in oven for 40 minutes. Remove foil and continue to cook for another 15 minutes or until cheese is golden and potatoes tender.

Enjoy xx
A

Saturday, 23 June 2012

Stir fried Brussels sprouts

I went and saw Jax Hamilton- form Masterchef and she cooked this as one of her dishes. Her advice was to sneak the sprouts into the house so no one sees them because no one will eat them otherwise.
I totally agree with her, it is so worth getting this one to the table without any one knowing what it is because they will not have a clue that what they are happily munching through is actually Brussels sprouts. There is no boiling, that is the main thing which automatically makes them a million times better than the green mush my mother used to serve up! I encourage you to give these a try- the farmer and I have been enjoying them just about every night with tea.

INGREDIENTS:
  • 8 Brussels sprouts
  • 1/2 tsp seasame oil
  • 1 Tblsp olive oil
  • small knob of butter
  • freshly ground black pepper
  • 1 clove garlic (crushed)
  • 2 rashers streaky bacon, sliced thinly
  • 4 spring onions thinly sliced
  • 1 tsp mixed dried herbs (or Tblsp fresh)
  • 1 Tblsp soy sauce
  • 1 Tblsp chopped fresh parsley
METHOD:
Purchase the sprouts in secret and prepare them while no one is watching- that is the secret to this recipe.
Take the sprouts and cut them in half, then slice thinly. Put them in a colander and rinse with cold water. Allow to drain. Using a large frying pan or wok over a medium heat, pour in the oils, butter and season with plenty of ground black pepper. Allow the butter to melt and then turn up the heat and add the garlic. Cook for about a minute and then add the sliced bacon. Fry until golden and then add the Brussels Sprouts. Mix in with the bacon and garlic for about 2 minutes until the sprouts start to wilt.
Now put in the spring onions, herbs and soy sauce. Taste and season. Cook for another two minutes or until they are as cooked as you prefer. We like them to be crispy at my house but you choose.  Now finally toss in the parsley and remove from the heat.

TIPS:
  • Serve as a side dish with pretty much any meat but chicken is particularly good.
  • Make sure you don't go overboard with the sesame oil- it has a very strong flavour.
  • grab a copy of Jax Hamilton's book Jax Cooks, because it is great!

Saturday, 12 May 2012

Chilli and garlic prawn kebabs

Tails on, if you serve on a bit of rice like this the marinade drips onto the rice-yum!
During the summer these are great to fire on the barbie, once winter rolls round just cook them inside in a big cast iron pan. These are fantastic on their own but the best is to cook them up and serve them with steak for a surf 'n' turf. I serve them with a bit of aioli too. You can buy prawns frozen or fresh, if you can get them fresh- then do, if not just make sure you defrost them correctly otherwise they can be a bit tough (read the packet for instructions).

INGREDIENTS:
  • 3 garlic cloves, finely chopped
  • 1 Tblsp sweet chilli sauce
  • 2 tablespoons olive oil
  • 2 teaspoons lime juice
  • Salt and cracked black pepper
  • 750g raw king prawns, peeled, de-veined, tails intact (or not, read tips)
  • Lime wedges, to serve
  • Aioli or mayonnaise, to serve

METHOD:
Place the garlic, sweet chilli, oil, lime juice, salt and pepper in a large non-metallic bowl and whisk until well combined. Add the prawns and toss to coat evenly. Cover and refrigerate for 15 minutes.
Heat a barbecue grill plate to high, or large cast iron pan/skillet. Remove prawns from marinade and thread onto metal or bamboo skewers (see tips).
Grill prawn skewers for 2 minutes each side or until prawns are cooked through and golden (they will change colour to orange). Serve skewers with lime wedges and aioli or mayonnaise.

I threw these together to show them made with prawn meat, no tails. Poor photo- apologies!
 TIPS:
  • If using bamboo skewers, soak then in cold water for at least 30 minutes before threading prawns to prevent burning while cooking. If you prefer, do not remove the seeds from the chilli for some extra heat.
  • If you like a bit more a of a kick, replace the sweet chilli with a fresh seeded and finely chopped chilli
  • If king prawns are a bit over the budget then prawn meat is fine (these are a bit smaller and have already been skinned and de-veined for you) , they don't look as pretty but they still taste great

Friday, 20 April 2012

Rustic homemade garlic bread


As I write this post, I am actually eating garlic bread. That is how fresh the bread and the post are. Garlic bread isn't really a recipe, it's more of a putting together of a few things to make garlicky goodness.
Today I went to the Geraldine Orchard farm shop and bought some of Derek's (that's the local baker) baguettes and thought that I would make some fancy bruschetta for tea, bit then I decided that garlic bread, homemade chips and steak would be pretty darn good for dinner instead.
So far, I have just made garlic bread and written this blog. The farmer usually has a beer on Friday night after work so I have a bit of time spare to cook the rest.
Anyway back to the point. Garlic bread. The amount of garlic you use is totally up to you, the size of the bread you have and how much you love garlic will determine the amount you use. I use HEAPS. Also the type of bread you choose depends on whether you like crunchy bread or a good ratio of white 'flesh' that can absorb all of that lovely garlicky butter. I have chosen baguette , ciabatta is also good or French stick- whatever you have on hand- or go and see Derek at the Tin Kitchen!

INGREDIENTS:
  • 1 loaf artisan French bread or wide baguette
  • 1 - 2 heads of garlic
  • 50g of  butter (again depends how big your bread is)
  • 1 bunch of chives (optional)
  • zest of one lemon (optional)
METHOD:
Using a serrated knife slice that loaf of bread right up the middle so you have two halves . Set them on their backs, cut side up. Mince the garlic or chop it really finely and add it to the butter you should be melting in a small saucepan.
Using a basting or pastry brush, slather the butter and garlic across the bread. Lets be honest I usually pour it over and then spread it around! Make sure your garlic chunks are evenly distributed.
Bake the bread for 10 minutes on 180 degrees Celsius. Turn your oven to grill and crank it up to 250 and grill it until the bread goes golden and crunchy around the outsides.
Let your bread cool for a bit and then sprinkle the chives and lemon over the top. The lemon is definitely optional but I think you will be sorry for missing the chives.
Slice and serve.


The short version of this recipe:
Cut, slather, bake, brown, slice.

Enjoy xx
A

Monday, 9 April 2012

Hedgehog potatoes

I used to love these as a kid. To be honest it's a bit of a stretch to say that they look like hedgehogs, I suppose you could construct little heads and faces on them but that is just ridiculous. Anyway, these are a good way of making potatoes a bit more exciting. These are also called hassle-back potatoes- depends where you went to school.

INGREDIENTS:
  • Olive oil
  • Whole roasting potatoes, allow two small or one large one per person
  • grated cheese (optional)
METHOD:
Pre heat your oven to 180 degrees Celsius. Take each potato and cut slices (not all the way through) across it, so that you have lots of 'spikes', you can also cut them cross ways to get even more realistic spikes but here I just did slices. Cover in olive oil so that each potato is covered (not swimming in it!). Bake for about 40minutes until cooked through and golden. Put grated cheese on the top of each potato and bake for a further 2 minutes, until the cheese melts.

TIPS:
  • Place a wooden spoon beside the potato you are cutting, this way you can't cut right through
  • Can put some rosemary and/or thyme in the pan for a bit of flavour too

Friday, 6 April 2012

Basil Rizoni pasta salad

I LOVE this salad and the farmer eats it even though it has paraphernalia in it, so it must be good! I use this recipe a lot for summer BBQs and especially when I am taking a salad somewhere. There are so many variations on this salad, and I promise to share my friend Pip's version- which is fabulous as well! You can make a big brew of this one because the best thing is that it keeps so what doesn't get eaten makes for a great lunch the next day!

INGREDIENTS:
  • 250g dried risoni pasta
  • 3 rashers of bacon chopped finely
  • 1 red onion chopped
  • 100g feta, crumbled or cubed
  • 8 sun-dried tomatoes
  • 60g (1/4 cup) bought basil pesto 
METHOD:
Cook the pasta in a large saucepan of lightly salted boiling water following packet directions or until al dente. Refresh under cold running water. Drain. Set aside to cool completely. In a pan cook bacon and onion, the onion will need less time as you want it to maintain its purple colour. Let this cool completely as well.
Combine the risoni pasta and the basil pesto- you will be able to stir it in to cover all of the pasta, if it is particularly thick, you can add a tblsp of water or lemon juice to make it stir through a bit easier.
In a salad bowl combine the bacon, onion, feta, tomatoes and pasta mixture. Toss to combine.

TIPS:
  • Make it ahead: Make up to 4 days ahead. Divide among airtight containers & store in the fridge. 
  • This recipe is perfect for catering for big numbers because you can multiply it really easily
  • Get creative, there are heaps of variations of this recipe
Enjoy xx
A

Monday, 26 March 2012

Almond beans


This is one of my favourites- ok the farmer usually opts for something else, but I think he is just the product of boarding school diets that didn't stretch to yummy sides like this one!! This is a great way of making a boring veg a dinner party star!!

INGREDIENTS:
  • fresh green beans, trimmed into about 3cm lengths
  • olive oil
  • salt
  • pepper
  • about 3 Tblsp slivered almonds
METHOD:
I like my green beans pretty much raw but if you like you can steam the beans for a minute to soften them up. In a small frying pan or wok, add a splash of Olive oil and your beans. Toss together over a medium heat until you get a sizzle. Add the almonds and toss together. Be careful not to burn the almonds, the oil will begin to come out of them and they smell amazing, this is when they are perfect- a minute more and you have burning!!

TIPS:
  • This is a great side with chicken or game dishes. The rich flavour of the almonds is a great way to bring some life to a meal
  • Add finely sliced crispy bacon and sliced roasted red capsicums to this dish to make a great side salad

Friday, 16 March 2012

Pan gravy- no packet!!

INGREDIENTS:
  • Pan juices from a roast
  • 2 Tblsp cornflour
  • salt
  • pepper
  • mixed herbs (optional)
  • 4 Tblsp cold water (must be cold)
  • more water (out of the peas is the best)
METHOD:
Take your roast out of the pan and put on a meat tray. Drain as much of the fat off the pan as you can. It will be the clear stuff at the top, pour into a metal or glass container so you can give it to the birds (down your sink isn't a good idea unless you have a cute plumber!?)
In a shaker or container with lid (a jar is sufficient) put the cornflour, salt, pepper and herbs. Add the cold water to this, if it is not cold you will get paste like kids use for paper mache- not good. Shake like heck until it is all mixed up and pour into the pan. Place the pan on a low heat on the stove top. Constantly stir the gravy, I use my 'gravy fork' which is an old fork bent at the top so that you can get some good pressure for scraping the crunchy bits off the pan. A whisk works fine also. Keep stirring until the gravy starts to thicken and then slowly add the rest of the water until you have about a cup and a half of gravy. The longer you boil it, the thicker it will be so just make it to how you like it.
This is my gravy fork, just bend an old one you have at home and you will have created a handy addition to your kitchen tools drawer!!

TIPS:
  • You may want to add something to help  make the gravy a darker colour- you can use a bit of Bisto (don't tell cause it's technically cheating), Marmite or BBQ sauce also works well. You don't need much, it is to colour not flavour!
  • Depending on what you are serving the gravy with you may want to add some cooked onions or mushrooms as well.
  • Chicken gravy won't need any help with colour and should be pale in colour, beef on the other hand should be a rich brown

Saturday, 3 March 2012

Potato Cakes

Meat and three veg is the basis of many meals in our house and countless others that have working men grace their table-sides and although the farmer is pretty good at trying new foods, there is always a look of a little disappoint if there is an absence of spud on his plate. There is absolutely nothing wrong with the meat/three veg meal, however sometimes it's nice to have a bit of variety. This is an easy way to achieve compromise; the farmer gets his beloved potato and I get away from the boiled spud!

INGREDIENTS:
  • 6 potatoes of medium size, scrubbed but skin on
  • 2 eggs
  • 1/4 cup flour
  • 1 clove chopped garlic
  • 2 Tblsp fresh chopped chives and parsley
METHOD:
Put the potatoes into the food processor and use the chopping blade (don't bother with the grating one, it just makes more dishes!) and whiz on full power until the potatoes are all chopped up. Add the remaining ingredients and mix them in. In a large pan heat some oil or butter and put large spoonfuls of the mixture into the pan and cook until golden, then turn to cook the other side. Because the potatoes you started with were raw, I bake these on 180degree Celsius for 10-15mins to cook through.

TIPS:
  • You can add a finely diced onion to add to the taste
  • To make these an addition to a big cooked breakfast, add some chopped bacon and cut the potatoes a bit chunkier to make rustic style hash browns

Saturday, 7 January 2012

Homemade Mayonnaise- so good for summer


INGREDIENTS:
  • 1 Egg (fresh is of course best)
  • 1/2 tsp sugar
  • 1/2 tsp salt
  • 1 tsp mustard (can use either powder of grainy depending on taste/what is in the house)
  • 2 Tblsp white wine vinegar (I also use apple cider vinegar)
  • 1 cup canola/olive/rice bran/flax seed oil (again depends what you have- plain taste is best I find)
METHOD:
Measure everything except the oil into your food processor or blender (can whisk but personally I think life is a bit short for whisking!). Mix a full speed until the ingredients are combined and then with the mixer still going on med-high speed, slowly- I said slowly  add the oil in, the slower you can get the oil streaming in, the thicker your mayo will be. Once oil is added you can leave the mixer going if you want it a bit thicker.

TIP:
For herb mayo: add 1/2 cup parsley and chives when you add the egg etc
For Aoili: add 1-2 cloves of garlic with the egg etc
There are really no rules about flavours so get creative- this mayonnaise with herbs also makes a great creamy pasta sauce.

Enjoy xxA